Appearance
Import a csv file
Prerequisites
Before importing a dataset, you must create a root collection.
Steps to import a csv file
Once you've created a root collection, follow these steps to import your csv file:
- In the sidebar, go to the Imports section.
Alternatively
Click ⋮ next to the collection to which you want to add a dataset, then click Add dataset and move to step 3.
Click Add dataset in the top left corner.
Enter a dataset name and select a parent collection (the collection your dataset will be added to).
Click Choose file and select the
.csvor.tsvfile you to import.Click Upload. Once the upload completes, the CSV Importer button appears.
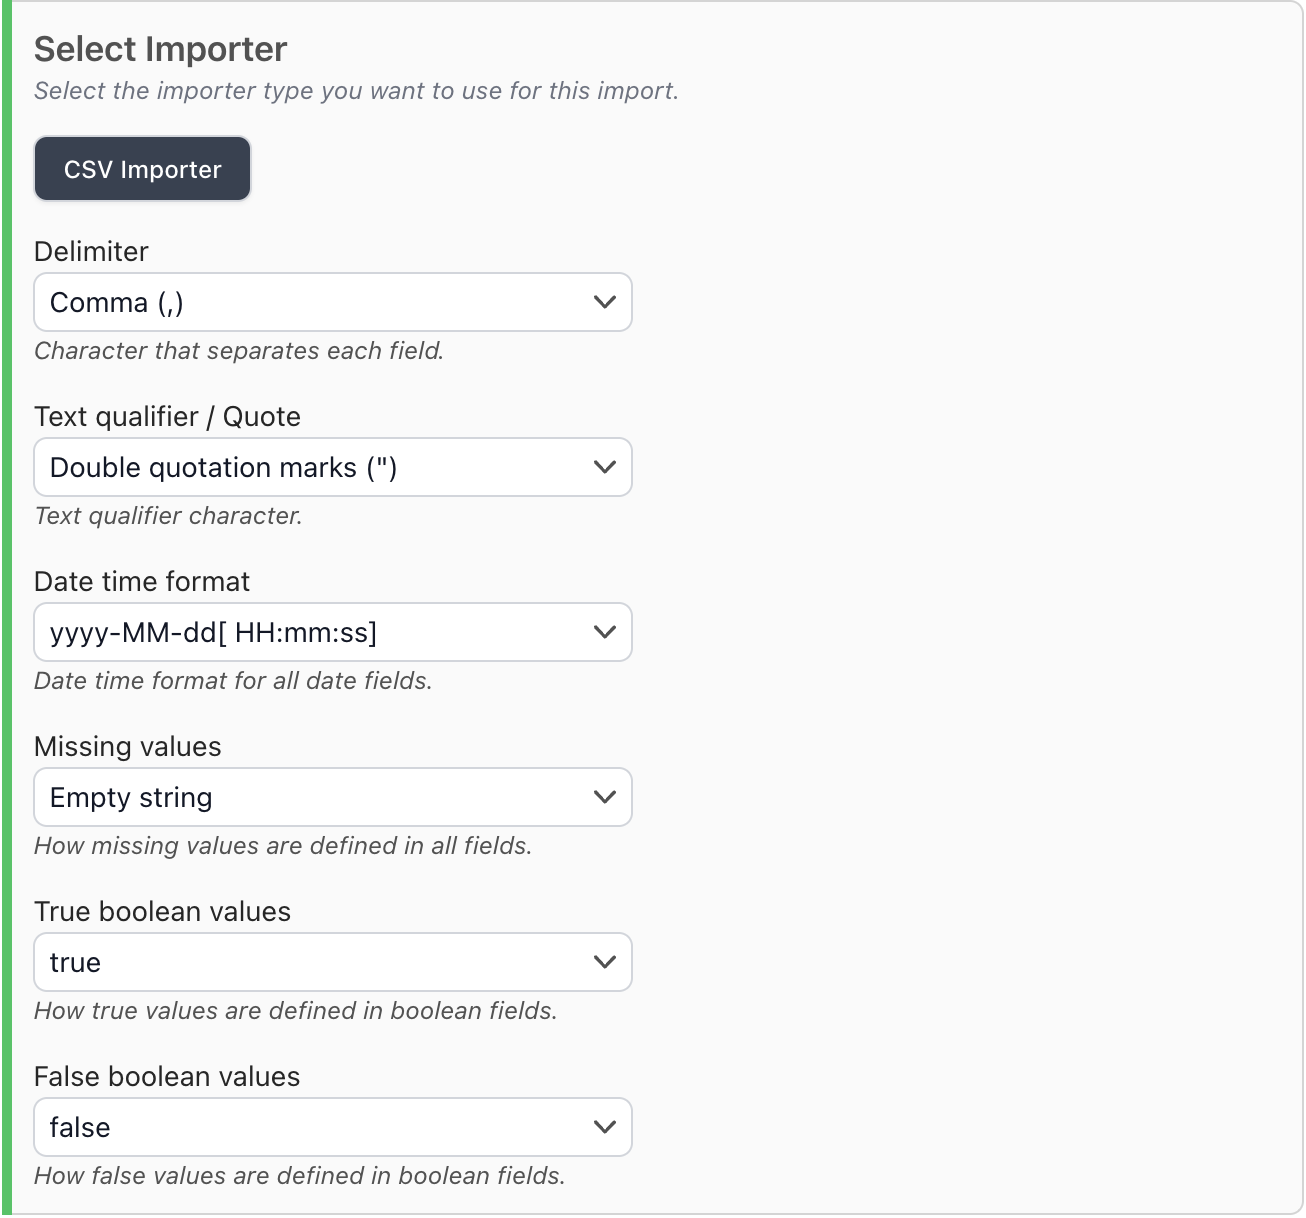
Configure the CSV importer
Click CSV Importer to open the CSV configuration panel.
Configure the CSV importer.
Preview import
Click Next in the bottom left corner. Alternatively, click Preview + Types at the top.
Click Import (preview) to start the preview import. Wait for the preview import to finish.
WARNING
During a preview import, only the first 100 rows of your data are processed. The parser will attempt to automatically guess your dataset's field types which helps streamline the next step.
Finalise the import
Click Set field types to open the field type selection panel. This panel displays the field types that were automatically guessed during the preview import.
Review the field types. Make any necessary adjustments, then click Approve in the bottom left corner of the field type selection panel.
Click Next in the bottom left corner. Alternatively, click Full import at the top.
Click Full import and wait for the full import to complete. Depending on the file size, this can take some time.
Click ->Visit dataset to see your imported dataset.
List imported files
In the sidebar, click Imports to see a table of all the datasets you've imported.
'%3e%3cg%20transform='matrix(1.00894,0,0,1.04036,-1.26111,-0.142908)'%3e%3cpath%20d='M41,1.59c0.75,-0%201.439,-0.422%201.78,-1.09l0.22,0l-0,22.03c-0,1.097%20-0.903,2%20-2,2c-1.097,-0%20-2,-0.903%20-2,-2l0,-22.03l0.24,0c0.338,0.661%201.017,1.082%201.76,1.09Zm6.71,22.94c-1.097,-0%20-2,-0.903%20-2,-2l-0,-15.19c-0,-1.097%200.903,-2%202,-2c1.097,-0%202,0.903%202,2l-0,17.19l-2,-0Zm3.06,-0l-0,-17.19c-0,-1.097%200.903,-2%202,-2c1.097,0%202,0.903%202,2l-0,17.19c-0.93,-0%20-1.15,-1.08%20-1.15,-2.13c0.002,1.121%20-0.881,2.062%20-2,2.13l-0.85,-0Zm-18.88,-2c-0,-1.097%200.903,-2%202,-2c1.097,-0%202,0.903%202,2c0,1.097%20-0.903,2%20-2,2c-1.097,-0%20-2,-0.903%20-2,-2Z'%20style='fill:%2328a1d7;'/%3e%3c/g%3e%3cg%20transform='matrix(1.00894,0,0,1.04036,-1.26111,-0.142908)'%3e%3cpath%20d='M26.73,6.46l0.07,-0c0.743,-0.008%201.422,-0.429%201.76,-1.09l0.22,-0l0,17.16c0,1.097%20-0.903,2%20-2,2c-1.097,-0%20-2,-0.903%20-2,-2l0,-17.16l0.22,-0c0.333,0.652%200.998,1.071%201.73,1.09Zm-1.99,-3.96c-0,-1.097%200.903,-2%202,-2c1.097,-0%202,0.903%202,2c-0,1.097%20-0.903,2%20-2,2c-1.097,-0%20-2,-0.903%20-2,-2Zm-21.49,22.03c-1.097,-0%20-2,-0.903%20-2,-2l0,-15.19c0,-1.097%200.903,-2%202,-2c1.097,-0%202,0.903%202,2l-0,17.19l-2,-0Zm5.9,-2.124c-0.001,1.118%20-0.883,2.056%20-2,2.124l-0.85,-0l-0,-17.19c-0,-1.097%200.903,-2%202,-2c1.097,0%202,0.903%202,2l-0,17.19c-0.938,-0%20-1.149,-1.076%20-1.15,-2.124Zm10.85,-17.036c1.097,-0%202,0.903%202,2l0,15.16c0,1.097%20-0.903,2%20-2,2c-1.097,-0%20-2,-0.903%20-2,-2l0,-17.16l2,-0Zm-5.84,2.109c0.004,-1.114%200.886,-2.045%202,-2.109l0.84,-0l0,17.16c0,1.097%20-0.903,2%20-2,2c-1.097,-0%20-2,-0.903%20-2,-2l0,-17.16c0.934,-0%201.157,1.066%201.16,2.109Z'%20style='fill:%23db021b;'/%3e%3c/g%3e%3c/g%3e%3c/svg%3e)
